
Download Link : HERE
Installing on Windows
With installer version
Please note: All screenshots are from Windows 8. Yours may look different, but the functionality is the same.
Make sure that the user account which is being used for the installation has administrative rights that allow the installation of software.
Possible Confirmation prompts
Depending on OS settings and version, it is possible that one or both of the following confirmation prompts appear:
License agreement
Hopefully you should now see the following window where you will have to accept the terms of the license agreement to continue. Read through it and click "I Agree" if you do.
Installing for me or all users?
You will now have to decide if you want to install only for your user account or if FileZilla should be accessible by every user on the machine. This mainly affects where the Start Menu icons are placed. Installing for all users needs administrative privileges, and every user will have his/her own settings.
Choosing components
Next you need to choose which parts of the FileZilla client you want to install. If you hover your mouse over a choice, FileZilla will show you a description of the item. Here is the window:
Go through all of them and just check/uncheck the stuff you want. Select additional languages if you want FileZilla in another language than English. Icon sets let you choose different looks for FileZilla's icons (they are partly user contributed). The shell extension integrates FileZilla into the Windows Explorer. Most users will go with what's selected by default here. When you're all finished, click Next.
Two small notes regarding the shell extension:
1. Installing or removing requires full administrative privileges.
2. Though FileZilla for Windows is only available as 32bit build, it contains a shell extension for both the 32bit and 64bit shell.
Install location
The next window will ask you where to install the program. If you don't have any special needs, click Next.
The default path is to install into your "Program Files" directory on 32bit Windows, and into "Program Files (x86)" on 64bit Windows. Please, if you are migrating from FileZilla 2, do NEVER, EVER install into the same directory as FileZilla 2! FileZilla 3 is not an upgrade to FileZilla 2, and merging both directories creates a mess.
Here, you will be asked what you want to name the folder with the shortcuts to FileZilla inside. The default name "FileZilla FTP Client" should be good for most people. You can also choose not to install these shortcuts.
Note to Windows 8 users: In Windows 8, MS has removed the Start Menu, but if you install the one from ClassicShell you will get your Start menu icons back.
Finishing installation
When you click Install, FileZilla will get installed.
If no errors occur it should complete in some seconds.
When it's done, click Next to finish the installation.
Congratulations, you've now successfully installed the FileZilla Client and can now move on to running!
Windows Vista/7/8 users: Note that if you select to start FileZilla from the installer, it inherits the installer permissions. In other words, it starts elevated from the installer, while from the Start Menu it does not. Basically, elevation does have influence on how the shell extension works and which directories are writable. Many users have posted into the forum why something works directly after installation, but fails later on. Now you know a possible cause.
With zip version
Installation with the zip version is very simple as long as you know how to work with zip files and can manage general file and directory handling in Windows. Basically you just extract (unzip) the downloaded file to a folder on your disk, e.g. "C:\Program Files\FileZilla FTP Client\" and then just start FileZilla with the filezilla.exe file afterwards. Please note that this action requires Elevation on Windows Vista/7/8! It might be a good idea to make a shortcut to this file on your desktop/start menu/quick launch so that you can easily access it.
To create a portable installation of FileZilla on a USB stick or any other portable storage, you first have to extract the ZIP file contents to that location. Then, you must create a file named "fzdefaults.xml" in the same directory as the FileZilla executable. There's an example file in the "./docs" subdirectory you can use as template. Follow the included instructions in the example file to set the config location to a relative path on your portable device.
Installing on Mac OS X
Please note that the official binaries for FileZilla require OS X 10.7 or greater.
To install FileZilla, simply download the appropriate file to your computer.
If you have downloaded the FileZilla package using Safari, it will be automatically extracted. You might have to manually extract the archive if you're using a different browser. To start FileZilla, simply doubleclick the extracted application bundle.
When you start FileZilla in the Finder, then you will see that the window of FileZilla is covered by the top menu. You may find it difficult to move the window, because you cannot click on the covered top of the FileZilla-window. Tip: You can resolve this problem by changing the resolution of your screen and then change it back to the original resolution (during the resolution change, OSX re-checks that all windows are properly oriented).
Connecting to a server
The first thing to do is connecting to a server.
This is our (fictional) login data - please use your own data instead if you want to actively follow the tutorial.
 Hostname: example.org
 Username: john
 Password: 7PjU#.J3
We will use the quickconnect bar for establishing the connection:
Enter the hostname into the quickconnect bar's Host: field, the username into the Username: field as well as the password into the Password: field. You may leave the Port: field empty unless your login information specifies a certain port to use. Now click on Quickconnect.
FileZilla will now try to connect to the server. If all works well, you will notice that the right "column" switched from Not connected to any server to displaying a list of files and directories.
Navigating and window layout
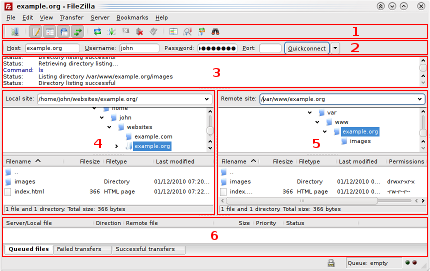
Legend: 1. Toolbar, 2. Quick connect bar, 3. Message log, 4. Local pane, 5. Remote pane, 6. Transfer queue (
Full-size version)
The next step is to get familiar with FileZilla's window layout.
Here is a quick introduction: Below the toolbar (1) and quick connect bar (2), the message log (3) displays transfer and connection related messages. Below, you can find the file listings. The left column (local pane, 4) displays the local files and directories, i.e. the stuff on the PC you're using FileZilla on. The right column (server pane, 5) displays the files and directories on the server you are connected to. Both columns have a directory tree at the top and a detailed listing of the currently selected directory's contents at the bottom. You can easily navigate either of the trees and lists by clicking around like in any other file manager. At the bottom of the window, the transfer queue (6) lists the to-be-transferred and already transferred files.
Transferring files
Now we will upload these files (or the ones you choose, respectively):
 website/
 +- index.html
 +- images/
    +- image01.jpg
    +- image02.jpg
Uploading
First - in the local pane - bring the directory into view which contains data to be uploaded (e.g. index.html and images/). Now, navigate to the desired target directory on the server (using the server pane's file listings). To upload the data, select the respective files/directories and drag them from the local to the remote pane. You will notice that the files will be added to thetransfer queue at the bottom of the window and soon thereafter get removed again - since they were (hopefully, if nothing went wrong) just uploaded to the server. The uploaded files and directories should now be displayed in the server content listing at the right side of the window.
Note: If you don't like using drag-and-drop, you can also right click on files/directories (in the lower local pane) and select Upload to upload them - or simply double-click a file entry (this does not work for directories).
Note (advanced): If you enable filtering and upload a complete directory, only the not-filtered-out files and directories inside this directory will be transferred.
Downloading
Downloading files, or complete directories, works essentially the same way as uploading - you just drag the files/directories from the remote pane to the local pane this time, instead of the other way round.
Note: In case you (accidentally) try to overwrite a file during upload or download, FileZilla will by default display a dialog asking what to do (overwrite, rename, skip...).
Using the site manager
Now that you are confident in transferring files (if not, practice a little bit), you might want to add the server information to the site manager to make it easy to reconnect to this server. To do this, select Copy current connection to Site Manager... in the File menu. The site manager will be opened and a new entry will be created with all the important information already filled in. You will notice that the entry's name is selected and highlighted - you can enter some descriptive name so you will later on find your server again (enter something like domain.com FTP server for example - you can rename it later if you wish). Now close the dialog by clicking on OK.
The next time you want to connect to this server, you can simply select it in the site manager and click Connect.


